This chapter will help you to identify the engine lathe’s attachments, accessories, and their uses. Also, it will identify and explain different machining operations and the factors related to machining operations. Of course, you will be expected to know and to follow the safety precautions associated with machining operations.
There are a number of different types of lathes installed in the machine shops. These include the engine lathe, the horizontal turret lathe, and several variations of the basic engine lathe, such as bench, toolroom, and gap lathes. All lathes, except the vertical turret type, have one thing in common. For all usual machining operations, the workpiece is held and rotated about a horizontal axis, while being formed to size and shape by a cutting tool. In the vertical turret lathe, the workpiece is rotated about a vertical axis. Of the various types of lathes, the type you are most likely to use is the engine lathe. Therefore, this chapter deals only with engine lathes and the machining operations you may have to perform.
NOTE: Before you attempt to operate any lathe, make sure you know how to operate it. Read all operating instructions supplied with the machine. Learn the locations of the various controls and how to operate them.
ENGINE LATHE
An engine lathe similar to the one shown in figure below is found in every machine shop. It is used mostly for

Figure—Typical engine lathe.
turning, boring, facing, and thread cutting. But it may also be used for drilling, reaming, knurling, grinding, spinning, and spring winding. Since you will primarily be concerned with turning, boring, facing, and thread cutting, we will deal primarily with those operations in this chapter.
The work held in the engine lathe can be revolved at any one of a number of different speeds, and the cutting tool can be accurately controlled by hand or power for longitudinal feed and cross feed. (Longitudinal feed is the movement of the cutting tool parallel to the axis of the lathe; cross feed is the movement of the cutting tool perpendicular to the axis of the lathe.)
Lathe size is determined by two measurements: (1) the diameter of work it will swing (turn) over the ways and (2) the length of the bed. For example, a 14-inch by 6-foot lathe will swing work up to 14 inches in diameter and has a bed that is 6 feet long.
Engine lathes vary in size from small bench lathes that have a swing of 9 inches to very large lathes for turning large diameter work such as low-pressure turbine rotors. The 16-inch lathe is the average size for general purposes and is the size usually installed in ships that have only one lathe.
PRINCIPAL PARTS
To learn the operation of the lathe, you must be familiar with the names and functions of the principal parts. Lathes from different manufacturers differ somewhat in construction, but all are built to perform the same general functions. As you read the description of each part, find its location on the lathe in figure and the figures that follow. (For specific details of features of construction and operating techniques, refer to the manufacturer’s technical manual for your machine.)
Bed and Ways
The bed is the base or foundation of the parts of the lathe. The main feature of the bed is the ways, which are formed on the bed’s upper surface and run the full length of the bed. The ways keep the tailstock and the carriage, which slide on them, in alignment with the headstock.
Headstock
The headstock contains the headstock spindle and the mechanism for driving it. In the belt-driven type, shown in figure, the driving mechanism consists of
Figure—Belt-driven type of headstock.
a motor-driven cone pulley that drives the spindle cone pulley through a drive belt. The spindle can be rotated either directly or through back gears.
When the headstock is set up for direct drive, a bull-gear pin, located under a cover to the right of the spindle pulley, connects the pulley to the spindle. This connection causes the spindle to turn at the same speed as the spindle pulley.
When the headstock is set up for gear drive, the bull-gear pin is pulled out, disconnecting the spindle pulley from the spindle. This allows the spindle to turn freely inside the spindle pulley. The back-gear lever, on the left end of the headstock, is moved to engage the back-gear set with a gear on the end of the spindle and a gear on the end of the spindle pulley. In this drive mode, the drive belt turns the spindle pulley, which turns the back-gear set, which turns the spindle. Each drive mode provides four spindle speeds, for a total of eight. The back-gear drive speeds are less slower than the direct-drive speeds.
Tailstock
The primary purpose of the tailstock is to hold the dead center to support one end of the work being

Figure—Side view of a carriage mounted on a bed.
machined. However, the tailstock can also be used to hold tapered shank drills, reamers, and drill chucks. It can be moved on the ways along the length of the bed and can be clamped in the desired position by tightening the tailstock clamping nut. This movement allows for the turning of different lengths of work. The tailstock can be adjusted laterally (front to back) to cut a taper by loosening the clamping screws at the bottom of the tailstock.
Before you insert a dead center, drill, or reamer, carefully clean the tapered shank and wipe out the tapered hole of the tailstock spindle. When you hold drills or reamers in the tapered hole of the spindle, be sure they are tight enough so they will not revolve. If you allow them to revolve, they will score the tapered hole and destroy its accuracy.
Carriage
The carriage is the movable support for the crossfeed slide and the compound rest. The compound rest carries the cutting tool in the tool post. Figure 9-3 shows how the carriage travels along the bed over which it slides on the outboard ways.
The carriage has T-slots or tapped holes to use for clamping work for boring or milling. When the carriage is used for boring and milling operations, carriage movement feeds the work to the cutting tool, which is rotated by the headstock spindle.
You can lock the carriage in any position on the bed by tightening the carriage clamp screw. But you do this only when you do such work as facing or parting-off, for which longitudinal feed is not required. Normally the carriage clamp is kept in the released position. Always move the carriage by hand to be sure it is free before you engage its automatic feed.
Apron
The apron is attached to the front of the carriage and contains the mechanism that controls the movement of the carriage and the crossslide.
Feed Rod
The feed rod transmits power to the apron to drive the longitudinal feed and crossfeed mechanisms. The feed rod is driven by the spindle through a train of gears. The ratio of feed rod speed to spindle speed can be varied by using change gears to produce various rates of feed.
Figure—Compound rest.
The rotating feed rod drives gears in the apron; these gears in turn drive the longitudinal feed and crossfeed mechanisms through friction clutches.
Some lathes do not have a separate feed rod, but use a spline in the lead screw for the same purpose.
Lead Screw
The lead screw is used for thread cutting. It has accurately cut Acme threads along its length that engage the threads of half-nuts in the apron when the half-nuts are clamped over it. The lead screw is driven by the spindle through a gear train. Therefore, the rotation of the lead screw bears a direct relation to the rotation of the spindle. When the half-nuts are engaged, the longitudinal movement of the carriage is controlled directly by the spindle rotation. Consequently, the cutting tool is moved a definite distance along the work for each revolution that the spindle makes.
Crossfeed Slide
The crossfeed slide is mounted to the top of the carriage in a dovetail and moves on the carriage at a right angle to the axis of the lathe. A crossfeed screw allows the slide to be moved toward or away from the work in accurate increments.
Compound Rest
The compound rest, mounted on the compound slide, provides a rigid adjustable mounting for the cutting tool. The compound rest assembly has the following principal parts:
1. The compound rest SWIVEL, which can be swung around to any desired angle and clamped in position. It is graduated over an arc of 90° on each side of its center position for easier setting to the angle selected. This feature is used for machining short, steep tapers, such as the angle on bevel gears, valve disks, and lathe centers.
2. The compound rest, or TOP SLIDE, which is mounted on the swivel section on a dovetailed slide. It is moved by the compound rest feed screw.
Figure—Common types of toolholders.
Figure—Knurling and threading toolholders.

This arrangement permits feeding the tool to the work at any angle (determined by the angular setting of the swivel section). The graduated collars on the crossfeed and compound rest feed screws read in thousandths of an inch for fine adjustment in regulating the depth of cut.
Accessories and Attachments
Accessories are the tools and equipment used in routine lathe machining operations. Attachments are special fixtures that may be mounted on the lathe to expand the use of the lathe to include taper cutting, milling, and grinding. Some of the common accessories and attachments are described in the following paragraphs.
TOOL POST.—The sole purpose of the tool post is to provide a rigid support for the tool. It is mounted in the T-slot of the compound rest. A forged tool or a toolholder is inserted in the slot in the tool post. By tightening a setscrew, you will firmly clamp the whole unit in place with the tool in the desired position.
TOOLHOLDERS—Some of the common toolholders used in lathe work are illustrated in figure . Notice the angles at which the tool bits are set in the various holders. These angles must be considered with respect to the angles ground on the tools and the angle that the toolholder is set with respect to the axis of the work.
Two types of toolholders that differ slightly from the common toolholders are those used for threading and knurling.
The threading toolholder has a formed cutter which needs to be ground only on the top surface for sharpening. Since the thread form is accurately shaped

Figure—Lathe tools and their applications.
over a large arc of the tool, as the surface is worn away by grinding, the cutter can be rotated to the correct position and secured by the setscrew.
A knurling toolholder carries two knurled rollers which impress their patterns on the work as it revolves. The purpose of the knurling tool is to provide a roughened surface on round metal parts, such as knobs, to give a better grip in handling. The knurled rollers come in a variety of patterns.
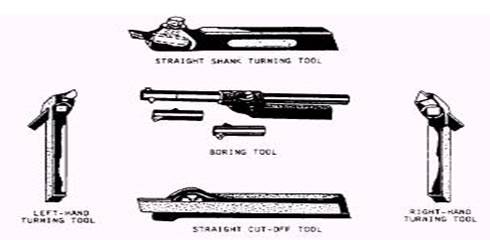
ENGINE LATHE TOOLS.—Figure shows the most popular shapes of ground lathe cutter bits and their applications. In the following paragraphs we will discuss each of the types shown.
Left-Hand Turning Tool.—This tool is ground for machining work when it is fed from left to right, as indicated in figure below, view A. The cutting edge is on the right side of the tool, and the top of the tool slopes down away from the cutting edge.
Figure–A. Four-Jaw chuck. B. Three-Jaw chuck.
Round-Nosed Turning Tool.–This tool is for general-purpose machine work and is used for taking light roughing cuts and finishing cuts. Usually, the top of the cutter bit is ground with side rake so the tool may be fed from right to left. Sometimes this cutter bit is ground flat on top so the tool may be fed in either direction ( view B).
Right-Hand Turning Tool.–This is just the opposite of the left-hand turning tool and is designed to cut when it is fed from right to left ( view C). The cutting edge is on the left side. This is an ideal tool for taking roughing cuts and for all-around machine work.
Left-Hand Facing Tool.–This tool is intended for facing on the left-hand side of the work (view D). The direction of feed is away from the lathe center. The cutting edge is on the right-hand side of the tool, and the point of the tool is sharp to permit machining a square corner.
Threading Tool.–The point of the threading tool is ground to a 60-degree included angle for machining V-form screw threads (view E). Usually, the top of the tool is ground flat, and there is clearance on both sides of the tool so it will cut on both sides.
Right-Hand Facing Tool.–This tool is just the opposite of the left-hand facing tool and is intended for facing the right end of the work and for machining the right side of a shoulder (view F).
Square-Nosed Parting (Cutoff) Tool.–The principal cutting edge of this tool is on the front (view G). Both sides of the tool must have sufficient clearance to prevent binding and should be ground slightly narrower at the back than at the cutting edge. This tool is convenient for machining necks and grooves and for squaring comers and cutting off.
Boring Tool.–The boring tool ( view H) is usually ground the same shape as the left-hand turning
Figure –Draw-in collet chuck.

Figure —Faceplate.
tool so that the cutting edge is on the right side of the cutter bit and may be fed in toward the headstock.
Inside-Threading Tool.—The inside-threading tool ( view J) has the same shape as the threading tool in figure ( view E), but it is usually much smaller. Boring and inside-threading tools may require larger relief angles when used in small diameter holes.
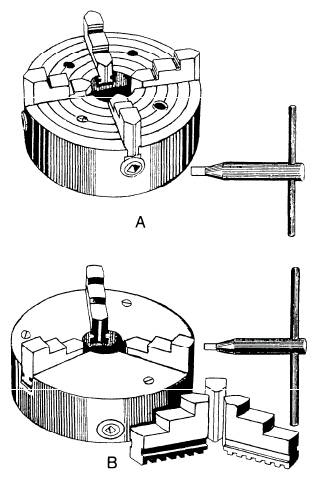
LATHE CHUCKS.—The lathe chuck is a device for holding lathe work. It is mounted on the nose of the spindle. The work is held by jaws which can be moved in radial slots toward the center of the chuck to clamp down on the sides of the work. These jaws are moved in and out by screws turned by a special chuck wrench.
The four-jaw independent lathe chuck, view A in figure , is the most practical chuck for general work The four jaws are adjusted one at a time, making it possible to hold work of various shapes and to adjust the center of the work to coincide with the axis of the spindle. The jaws are reversible.
The three-jaw universal or scroll chuck, view B in figure, can be used only for holding round or hexagonal work All three jaws move in and out together in one operation and bring the work on center automatically. This chuck is easier to operate than the four-jaw type, but, when its parts become worn, its accuracy in centering cannot be relied upon. Proper lubrication and constant care are necessary to ensure reliability.
The draw-in collet chuck is used to hold small work for machining in the lathe. It is the most accurate type of chuck made and is intended for precision work. Figure shows the parts assembled in place in the lathe spindle. The collet, which holds the work, is a split-cylinder with an outside taper that fits into the tapered closing sleeve and screws into the threaded end of the hollow drawbar. As the handwheel is turned clockwise, the drawbar is moved toward the handwheel. This tightening up on the drawbar pulls the collet back into the tapered sleeve, thereby closing it firmly over the work and centering the work accurately and quickly. The size of the hole in the collet determines the diameter of the work the chuck can handle.
Faceplates
The faceplate is used for holding work that, because of its shape and dimensions, cannot be swung between centers or in a chuck. The T-slots and other openings on its surface provide convenient anchors for bolts and clamps used in securing the work to it. The faceplate is mounted on the nose of the spindle.
The driving plate is similar to a small faceplate and is used mainly for driving work that is held between centers. The primary difference between a faceplate and a driving plate is that a faceplate has a machined face for precision mounting, while the face of a driving plate is left rough. When a driving plate is used, the bent tail of a dog clamped to the work is inserted into a slot in the faceplate. This transmits rotary motion to the work.
Figure —60-degree lathe centers.
Figure —Lathe dogs.
Lathe Centers
The 60-degree lathe centers shown in figure provide a way to hold the work so it can be turned accurately on its axis. The headstock spindle center is called the LIVE CENTER because it revolves with the work. The tailstock center is called the DEAD CENTER because it does not turn. Both live and dead centers have shanks turned to a Morse taper to fit the tapered holes in the spindles; both have points finished to an angle of 60°. They differ only in that the dead center is hardened and tempered to resist the wearing effect of the work revolving on it. The live center revolves with the work and is usually left soft. The dead center and live center must NEVER be interchanged. (There is a groove around the hardened dead center to distinguish it from the live center.)
The centers fit snugly in the tapered holes of the headstock and tailstock spindles. If chips, dirt, or burrs prevent a perfect fit in the spindles, the centers will not run true.
To remove the headstock center, insert a brass rod through the spindle hole and tap the center to jar it loose; then pull it out with your hand. To remove the tailstock center, run the spindle back as far as it will go by turning the handwheel to the left. When the end of the tailstock
Figure —Center rest.
screw bumps the back of the center, it will force the center out of the tapered hole.
Lathe Dogs
Lathe dogs are used with a driving plate or faceplate to drive work being machined on centers; the frictional contact alone between the live center and the work is not sufficient to drive the work
The common lathe dog, shown at the left in figure , is used for round work or work having a regular section (square, hexagon, octagon). The piece to be turned is held firmly in the hole (A) by the setscrew (B). The bent tail (C) projects through a slot or hole in the driving plate or faceplate so that when the tail revolves with the spindle it turns the work with it. The clamp dog, illustrated at the right in figure , may be used for rectangular or irregularly shaped work. Such work is clamped between the jaws,
Center Rest
The center rest, also called the steady rest, is used for the following purposes:
1. To provide an intermediate support for long slender bars or shafts being machined between centers. The center rest prevents them from springing, or sagging, as a result of their otherwise unsupported weight.

Figure —Follower rest.
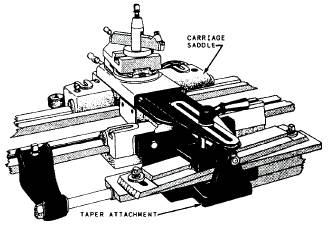
Figure —Taper attachment.
2. To support and provide a center bearing for one end of the work, such as a shaft, being bored or drilled from the end when it is too long to be supported by a chuck alone. The center rest is clamped in the desired position on the bed and is kept aligned by the ways, as illustrated in figure . The jaws (A) must be carefully adjusted to allow the work (B) to turn freely and at the same time remain accurately centered on the axis of the lathe. The top half of the frame is a hinged section (C) for easier positioning without having to remove the work from the centers or to change the position of the jaws.
Follower Rest
The follower rest is used to back up small diameter work to keep it from springing under the cutting
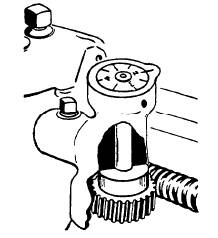
Figure —Thread dial Indicator.
pressure. It can be set to either precede or follow the cutting action. As shown in figure, it is attached directly to the saddle by bolts (B). The adjustable jaws bear directly on the part of the work opposite the cutting tool.
Taper Attachment
The taper attachment, illustrated in figure , is used for turning and boring tapers. It is bolted to the back of the carriage. In operation, it is connected to the cross slide so that it moves the cross slide traversely as the carriage moves longitudinally, thereby causing the cutting tool to move at an angle to the axis of the work to produce a taper.
The desired angle of taper is set on the guide bar of the attachment. The guide bar support is clamped to the lathe bed Since the cross slide is connected to a shoe that slides on this guide bar, the tool follows along a line parallel to the guide bar and at an angle to the work axis corresponding to the desired taper.
The operation of the taper attachment will be further explained under the subject of taper work
Thread Dial Indicator
The thread dial indicator, shown in figure , eliminates the need to reverse the lathe to return the carriage to the starting point each time a successive threading cut is taken. The dial, which is geared to the lead screw, indicates when to clamp the half-nuts on the lead screw for the next cut.
The threading dial consists of a worm wheel which is attached to the lower end of a shaft and meshed with
Figure —Micrometer carriage stop.
the lead screw. On the upper end of the shaft is the dial. As the lead screw revolves, the dial is turned and the graduations on the dial indicate points at which the half-nuts may be engaged.
Carriage Stop
The carriage stop can be attached to the bed at any point where the carriage should stop. It is used primarily for turning, facing, or boring duplicate parts, as it eliminates taking repeated measurements of the same dimension. In operation, the stop is set at the point where the feed should stop. To use the stop, just before the carriage reaches the stopping point, shut off the automatic feed and manually run the carriage up against the stop. Carriage stops are provided with or without micrometer adjustment. Figure shows a micrometer carriage stop. Clamp it on the ways in the approximate position required, and then adjust it to the exact setting by using the micrometer adjustment. (Do not confuse this stop with the automatic carriage stop that automatically stops the carriage by disengaging the feed or stopping the lathe.)
MAINTENANCE
Every lathe must be maintained strictly according to requirements of the Maintenance and Material Management (3-M) Systems. The first requirement of maintenance to your lathe is proper lubrication. Make it a point to oil your lathe daily where oil holes are provided. Oil the ways daily-not only for lubrication but to protect their scraped surfaces. Oil the lead screw often while it is in use; this is necessary to preserve its accuracy, for a worn lead screw lacks precision in thread cutting. Make sure the headstock is filled to the proper oil level; drain the oil out and replace it when it becomes dirty or gummy. If your lathe is equipped with an automatic oiling system for some parts, make sure all those parts are getting oil. Make it a habit to CHECK frequently to see that all moving parts are being lubricated.
Before engaging the longitudinal ‘feed, be certain that the carriage clamp screw is loose and that the carriage can be moved by hand. Avoid running the carriage against the headstock or tailstock while it is under the power feed; running the carriage against the headstock or tailstock puts an unnecessary strain on the lathe and may jam the gears.
Do not neglect the motor just because it may be out of sight; check its lubrication. If it does not run properly, notify the Electrician’s Mate who is responsible for caring for it. He or she will cooperate with you to keep it in good condition. On lathes with a belt driven from the motor, avoid getting oil or grease on the belt when you oil the lathe or motor.
Keep your lathe clean. A clean and orderly machine is an indication of a good mechanic. Dirt and chips on the ways, on the lead screw, and on the crossfeed screws will cause serious wear and impair the accuracy of the machine.
NEVER put wrenches, files, or other tools on the ways. If you must keep tools on the bed, use a board to protect the finished surfaces of the ways.
NEVER use the bed or carriage as an anvil. Remember, the lathe is a precision machine, and nothing must be allowed to destroy its accuracy.
BASIC SETUP
A knowledge of the basic setup is required if you are to become proficient in performing machine work with a lathe. Some of these setups are considered in the following sections.
Cutting Speeds and Feeds
Cutting speed is the rate at which the surface of the work passes the point of the cutting tool. It is expressed in feet per minute (fpm).
Feed is the amount the tool advances for each revolution of the work. It is usually expressed in thousandths of an inch per revolution of the spindle. Cutting speeds and tool feeds are determined by various considerations: the hardness and toughness of the metal being cut; the quality, shape, and sharpness of the cutting tool; the depth of the cut; the tendency of the work to spring away from the tool; and the strength and power of the lathe. Since conditions vary, it is good practice to find out what the tool and work will stand and then select the most practical and efficient speed and feed for the finish desired.
When ROUGHING parts down to size, use the greatest depth of cut and feed per revolution that the work, the machine, and the tool will stand at the highest practical speed. On many pieces where tool failure is the limiting factor in the size of the roughing cut, you may be able to reduce the speed slightly and increase the feed to remove more metal. This will prolong tool life. Consider an example where the depth of cut is 1/4 inch, the feed 0.020 inch per revolution, and the speed 80 fpm. If the tool will not permit additional feed at this speed, you can drop the speed to 60 fpm and increase the feed to about 0.040 inch per revolution without having tool trouble. The speed is therefore reduced 25 percent, but the feed is increased 100 percent. Thus the actual time required to complete the work is less with the second setup.
For the FINISH TURNING OPERATION, take a very light cut, since you removed most of the stock during the roughing cut. Use a fine feed to run at a high surface speed. Try a 50 percent increase in speed over the roughing speed. In some cases, the finishing speed may be twice the roughing speed. In any event, run the work as fast as the tool will withstand to obtain the maximum speed during this operation. Be sure to use a sharp tool when you are finish turning.
COOLANTS
A cutting lubricant serves two main purposes: (1) It cools the tool by absorbing a portion of the heat and reducing the friction between the tool and the metal being cut. (2) It also keeps the cutting edge of the tool flushed clean.
The best lubricants to use for cutting metal must often be determined by experiment. Water-soluble oil is acceptable for most common metals. Special cutting compounds containing such ingredients as tallow, graphite, and lard, marketed under various names, are also used. But these are expensive and used mainly in manufacturing where high cutting speeds are the rule.
Some common materials and their cutting lubricants are as follows:
A lubricant is more important for threading than for straight turning. Mineral lard oil is recommended for threading the majority of metals that are used by the Navy.
CHATTER
Chatter is vibration in either the tool or the work The finished work surface appears to have a grooved or lined finish instead of a smooth surface. The vibration is set up by a weakness in the work, work support, tool, or tool support and is probably the most elusive thing you will find in the entire field of machine work As a general rule, strengthening the various parts of the tool support train will help. It is also advisable to support the work by a center rest or follower rest.
The fault may be in the machine adjustments. Gibs may be too loose; hearings may, after a long period of heavy service, be worn; the tool may be sharpened improperly, and so on. If the machine is in excellent condition, the fault may be in the tool or tool setup. Grind the tool with a point or as near a point as the finish specified will permit; avoid a wide, round leading edge on the tool. Reduce the overhang of the tool as much as possible. Be sure all the gib and bearing adjustments are properly made. See that the work receives proper support for the cut and, above all, do not try to turn at a surface speed that is too high. Excessive speed is probably the greatest cause of chatter. The first thing you should do when chatter occurs is reduce the speed.
Direction of Feed
Regardless of how the work is held in the lathe, the tool should feed toward the headstock. This causes most

Figure —Checking a center’s point with a center gauge.
of the pressure of the cut to bear on the work-holding device and the spindle thrust bearings. When you must feed the cutting tool toward the tailstock, take lighter cuts at reduced feeds. In facing, the general practice is to feed the tool from the center of the workpiece outward.
PRELIMINARY PROCEDURES
Before starting a lathe machining operation, always ensure that the machine is set up properly. If the work is mounted between centers, check the alignment of the dead center and the live center and make any necessary changes. Ensure that the toolholder and cutting tool are set at the proper height and angle. Check the work-holding accessory to ensure that the workpiece is held securely. Use the center rest or follower rest to support long workpieces.
PREPARING THE CENTERS
The first step in preparing the centers is to see that they are accurately mounted in the headstock and tailstock spindles. The centers and the tapered holes in which they are fitted must be perfectly clean. Chips and dirt left on the contact surfaces prevent the bearing surfaces from fitting perfectly. This will decrease the accuracy of your work. Make sure that there are no burrs in the spindle hole. If you find burrs, remove them by carefully scraping and reaming the hole with a Morse taper reamer. Burrs will produce the same inaccuracies as chips or dirt.
A center’s point must be finished accurately to an angle of 60°. Figure shows the method of checking this angle with a center gauge. The large notch of the center gauge is intended for this purpose. If this test shows that the point is not perfect, you must true it in the lathe by taking a cut over the point with the compound rest set at 30°. You must anneal the hardened tail center before it can be machined in this manner, or you can grind it if a grinding attachment is available.
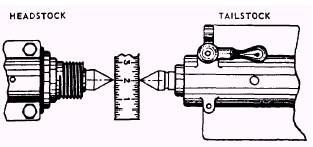
Figure —Aligning lathe centers.

Figure —Tool overhang.
CHECKING ALIGNMENT
To turn a shaft straight and true between centers, be sure the centers are aligned in a plane parallel to the ways of the lathe. You can check the approximate alignment of the centers by moving the tailstockup until the centers almost touch and observing their relative positions as shown in figure .
To test center alignment for very accurate work, take a light cut over at each end with a micrometer and, if readings are found to differ, adjust the tailstock accordingly. Repeat the procedure until alignment is obtained.
SETTING THE TOOLHOLDER AND THE CUTTING TOOL
The first requirement for setting the tool is to have it rigidly mounted on the tool post holder. Be sure the tool sets squarely in the tool post and that the setscrew is tight. Reduce overhang as much as possible to prevent the tool bit from springing during cutting. If the tool has too much spring, the point of the tool will catch in the work, causing chatter and damaging both the tool and the work The distances represented by A and B in figure
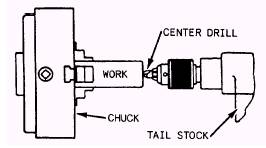
Figure —Drilling a center hole.
show the correct overhang for the tool bit and the holder.
The point of the tool must be correctly positioned on the work Place the cutting edge. slightly above the center for straight turning of steel and cast iron and exactly on the center for all other work To set the tool at the height desired, raise or lower the point of the tool by moving the wedge in or out of the tool post ring. By placing the point opposite the tailstock center point, you can adjust the setting accurately.
HOLDING THE WORK
You cannot perform accurate work if the workpiece is improperly mounted. The requirements for proper mounting are as follows:
1. The work center line must be accurately centered along the axis of the lathe spindle.
2. The work must be held rigidly while being turned.
3. The work must NOT be sprung out of shape by the holding device.
4. The work must be adequately supported against any sagging caused by its own weight and against springing caused by the action of the cutting tool.
There are four general methods of holding work in the lathe: (1) between centers, (2) on a mandrel, (3) in a chuck, and (4) on a faceplate. Work may also be clamped to the carriage for boring and milling, in which case the boring bar or milling cutter is held and driven by the headstock spindle.
Other methods of holding work to suit special conditions are (1) one end on the live center or in a chuck and the other end supported in a center rest, and (2) one end in a chuck and the other end on the dead center.
Holding Work Between Centers
To machine a workpiece between centers, drill center holes in each end to receive the lathe centers. Secure a lathe dog to the workpiece. Then mount the work between the live and dead centers of the lathe.
CENTERING THE WORK.—To center round stock where the ends are to be turned and must be concentric with the unturned body, mount the work on the head spindle in a universal chuck or a draw-in collet chuck If the work is long and too large to pass through the spindle, use a center rest to support one end. Mount a center drill in a drill chuck in the tailstock spindle and feed it to the work by turning the tailstock handwheel.
For center drilling a workpiece, the combined drill and countersink is the most practical tool. These combined drills and countersinks vary in size and the drill points also vary. Sometimes a drill point on one end will be 1/8 inch in diameter, and the drill point on the opposite end will be 3/16 inch in diameter. The angle of the center drill must always be 60° so that the countersunk hole will fit the angle of the lathe center point. If a center drill is not available, center the work with a small twist drill. Let the drill enter the work a sufficient distance on each end; then follow with a 60° countersink.
In center drilling, use a drop or two of oil on the drill. Feed the drill slowly and carefully to prevent breaking the tip. Take extreme care when the work is heavy, because you will be less able to “feel” the proper feed of the work on the center drill.
If the center drill breaks during countersinking and part of the broken drill remains in the work, you must remove this part. Sometimes you can drive the broken piece out by a chisel or by jarring it loose, but it may stick so hard that you cannot remove it this way. Then you must anneal the broken part of the drill and drill it out.
We cannot overemphasize the importance of proper center holes in the work and a correct angle on the point of the lathe centers. To do an accurate job between centers on the lathe, you must ensure that the center-drilled holes are the proper size and depth and that the points of the lathe centers are true and accurate.
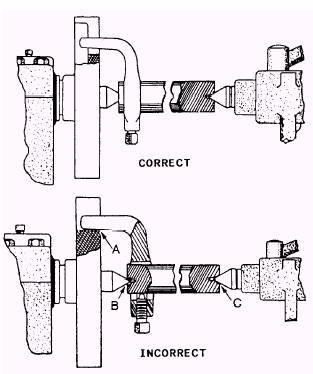
Figure —Examples of work mounted between centers.
MOUNTING THE WORK.—Figure shows correct and incorrect ways to mount work between centers. In the correct example, the driving dog is attached to the work and held rigidly by the setscrew. The tail of the dog rests in the slot of the faceplate, without touching the bottom of the slot. The tail extends beyond the base of the slot so that the work rests firmly on both the headstock center and the tailstock center. In the incorrect example, note that the tail of the dog rests on the bottom of the slot on the faceplate at A and pulls the work away from the center’s point, as shown at B and C. This causes the work to revolve eccentrically.
In mounting work between centers for machining, be sure there is no end play between the work and the dead center. However, do not have the work held too tightly by the tailstock center. If you do, as the work revolves, it will heat the center’s point, destroying both itself and the center. To help prevent overheating, lubricate the tailstock center with grease or oil.
Holding Work on a Mandrel
Many parts, such as bushings, gears, collars, and pulleys, require all the finished external surfaces to run true with their center hole, or bore.
General practice is to finish the bore to a standard size within the limit of the accuracy desired. Thus a 3/4-inch standard bore would have a finished diameter of from 0.7495 to 0.7505 inch This variation is due to a tolerance of 0.0005 inch below and above the true standard of exactly 0.750 inch. First drill the hole to within a few thousandths of an inch of the finished size; then remove the remainder of the material with a machine reamer, following with a hand reamer if the limits are extremely close.
Then press the piece on a mandrel tightly enough so the work will not slip while being machined Clamp a dog on the mandrel, which is mounted between centers. Since the mandrel surface runs true with respect to the lathe axis, the turned surfaces of the work on the mandrel will be true with respect to the bore of the piece. A mandrel is simply a round piece of steel of convenient length which has been center drilled and ground true with the center holes. Commercial mandrels are made of tool steel, hardened and ground with a slight taper (usually 0.0005 inch per inch). This taper allows the standard hole in the work to vary according to the usual shop practice and still provides a drive to the work when the mandrel is pressed into the hole. The taper is not great enough to distort the hole in the work The center-drilled centers of the mandrel are lapped for accuracy. The ends are turned smaller than the body of the mandrel and provided with flats, which give a driving surface for the lathe dog.
Holding Work in Chucks
The independent chuck and universal chuck are used more often than other work-holding devices in lathe operations. The universal chuck is used for holding relatively true cylindrical work when the time required to do the job is more important than the concentricity of the machined surface and the holding power of the chuck When the work is irregular in shape, must be accurately centered, or must be held securely for heavy feeds and depth of cuts, an independent chuck is used. FOUR- JAW INDEPENDENT CHUCK.-Figure shows a rough cylindrical casting mounted in a four-jaw independent lathe chuck on the spindle of the lathe. Before truing the work, determine which part you wish to have turned true. To mount this casting in the chuck, proceed as follows:
1. Adjust the chuck jaws to receive the casting. The same point on each jaw should touch the same ring on the face of the chuck If there are no
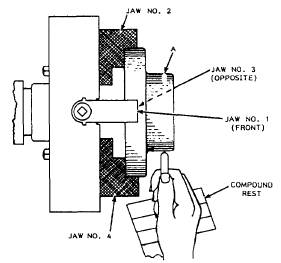
Figure —Work mounted in a four-jaw chuck.
rings, put each jaw the same distance from the outside edge of the body of the chuck.
2. Fasten the work in the chuck by turning the adjusting screw on jaw 1 and then on jaw 3, a pair of jaws which are opposite each other. Next, tighten jaws 2 and 4.
3. At this stage the work should be held in the jaws just tightly enough so it will not fall out of the chuck while you turn it.
4. Revolve the spindle slowly by hand and, with a piece of chalk, mark the high spot (A) on the work while it is revolving. Steady your hand on the tool post while holding the chalk.
5. Stop the spindle. Locate the high spot on the work and move the high spot toward the center of the chuck by releasing the jaw opposite the chalk mark and tightening the one nearest the mark
6. Sometimes the high spot on the work will be located between adjacent jaws. In that case, loosen the two opposite jaws and tighten the jaws adjacent to the high spot.
THREE-JAW UNIVERSAL CHUCK.—The three-jaw universal or scroll chuck is made so that all jaws move at the same time. A universal chuck will center almost exactly at the first clamping, but after a long period of use may develop inaccuracies of up to 0.010 inch in centering the work. You can usually correct the inaccuracy by inserting a piece of paper or thin shim stock between the jaw and the work on the high side.
When you chuck thin sections, be careful not to clamp the work too tightly because the work will distort. If you machine distorted work, the finished work will have as many high spots as there are jaws, and the turned surface will not be true.
Care of Chucks
To preserve the accuracy of a chuck, handle it carefully and keep it clean and free from grit.
NEVER force a chuck jaw by using a pipe as an extension on the chuck wrench.
Before mounting a chuck, remove the live center and fill the hole with a rag to prevent chips and dirt from getting into the tapered hole of the spindle. Clean and oil the threads of the chuck and the spindle nose. Dirt or chips on the threads will not allow the chuck to run true when it is screwed up to the shoulder. Screw the chuck on carefully, tightening it just enough to make it difficult to remove. Never use mechanical power to install a chuck.
To remove a chuck, place a spanner wrench on the collar of the chuck and strike a smart blow on the handle of the wrench with your hand. When you mount or remove a heavy chuck, lay a board across the bed ways to protect them; the board will support the chuck as you put it on or take it off.
The comments on mounting and removing chucks also apply to faceplates.
Holding Work on a Faceplate
A faceplate is used for mounting work that cannot be chucked or turned between centers because of its size or shape.
Work is secured to the faceplate by bolts, clamps, or any suitable clamping means. The holes and slots in the faceplate are used for anchoring the holding bolts. Angle plates may be used to position the work at the desired
Figure —Work clamped to an angle plate.
angle, as shown in figure . Note the counterweight added for balance.
For work to be mounted accurately on a faceplate, the surface of the work in contact with the faceplate must be accurately faced. It is good practice to place a piece of paper between the work and the faceplate to prevent slipping.
Before you clamp the work securely, move it about on the surface of the faceplate until the point to be machined is centered accurately with the axis of the lathe. Suppose you wish to bore a hole, the center of which has been laid out and marked with a prick punch. First, clamp the work to the approximate position on the faceplate. Slide the tailstock up until the dead center just touches the work. (NOTE: The dead center should have a sharp, true point.) Now revolve the work slowly; if the work is off center, the point will scribe a circle on the work. If the work is on center, the point of the dead center will coincide with the prick punch mark.
Using the Center Rest and Follower Rest
Place the center rest on the ways where it will give the greatest support to the workpiece. This is usually at about the middle of its length.
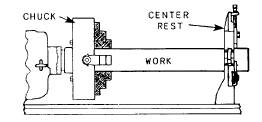
Figure —Work mounted in a chuck and center rest.
Ensure that the jaws of the center rest are adjusted to support the work while allowing it to turn freely. Figure shows how a chuck and center rest are used for machining the end of a workpiece.
The follower rest differs from the center rest in that it moves with the carriage and provides support against the forces of the cut only. Set the tool to the diameter selected, and turn a “spot” about 5/8 to 3/4 inch wide. Then adjust the follower rest jaws to the finished diameter to follow the tool along the entire length to be turned.
Use a thick oil on the center rest and follower rest to prevent “seizing” and scoring of the workpiece. Check the jaws frequently to see that they do not become hot. The jaws may expand slightly if they get hot, pushing the work out of alignment (when using the follower rest) or binding (when using the center rest).
Holding Work in a Draw-In Collet Chuck
The draw-in collet chuck is used for very fine, accurate work of small diameter. Long work can be passed through the hollow drawbar. Short work can be placed directly into the collet from the front. The collet is tightened on the work by rotating the drawbar to the right; this draws the collet into the tapered closing sleeve. The opposite operation releases the collet. Accurate results are obtained when the diameter of the work is exactly the same size as the dimension stamped on the collet. In some cases, the diameter may vary as much as 0.002 inch; that is, the work may be 0.001 inch smaller or larger than the collet size. If the work diameter varies more than this, it will impair the accuracy and efficiency of the collet. That is why a separate collet should be used for each small variation or work diameter, especially if precision is desired.

Figure .—Facing a cylindrical piece.

Figure —Facing a shoulder.
MACHINING OPERATIONS
Up to this point, you have studied the preliminary steps leading to the performance of machine work in the lathe. You have learned how to mount the work and the tool and which tools are used for various purposes. Now, you need to consider how to use the proper tools in combination with the lathe to perform various machining operations.
FACING
Facing is the machining of the end surfaces and shoulders of a workpiece. In addition to squaring the ends of the work, facing provides a way to cut work to length accurately. Generally, only light cuts are required since the work will have been cut to approximate length or rough machined to the shoulder.
Figure shows the facing of a cylindrical piece. The work is placed between centers and driven by a dog. A right-hand side tool is used as shown. Take a light cut on the end of the work, feeding the tool (by hand crossfeed) from the center toward the outside. Take one or two light cuts to remove enough stock to true the work Then reverse the workpiece, install the dog on the just finished end, and face the other end to make the work the proper length. To provide an accurate base from which to measure, hold another rule or straightedge on the end you faced first. Be sure there is no burr on the edge to keep the straightedge from bearing accurately on the finished end. Use a sharp scribe to mark off the dimension desired. Figure shows the use of a turning tool in finishing a shouldered job having a fillet corner. Take a finish cut on the small diameter. Machine the fillet with a light cut. Then use the tool to face the work from the fillet to the outside of the work.
In facing large surfaces, lock the carriage in position, since only crossfeed is required to traverse the tool across the work. With the compound rest set at 90° (parallel to the axis of the lathe), you can use the micrometer collar to feed the tool to the proper depth of cut.
TURNING
Turning is the machining of excess stock from the periphery of the workpiece to reduce the diameter. In most lathe machining operations requiring removal of large amounts of stock, a series of roughing cuts is taken to remove most of the excess stock Then a finishing cut is taken to accurately “size” the workpiece.
Rough Turning
When a great deal of stock is to be removed, you should take heavy cuts to complete the job in the least possible time. This is called rough turning. Select the proper tool for taking a heavy chip. The speed of the work and the amount of feed of the tool should be as great as the tool will stand.
When you take a roughing cut on steel, cast iron, or any other metal that has a scale on its surface, be sure to set the tool deep enough to get under the scale in the first cut. Unless you do, the scale on the metal will dull or break the point of the tool.
Rough machine the work to almost the finished size; then take careful measurements.
Bear in mind that the diameter of the work being turned is reduced by an amount equal to twice the depth of the cuts; thus, if you desire to reduce the diameter of a piece by 1/4 inch, you must remove 1/8 inch of metal from the surface.
Figure shows the position of the tool for taking a heavy cut on large work. Set the tool so that if anything
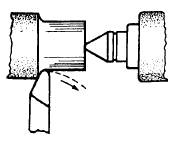
Figure —Position of the tool for a heavy cut.
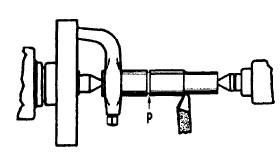
Figure —Machining to a shoulder.
occurs during machining to change the position of the tool, it will not dig into the work, but rather will move in the direction of the arrow-away from the work
Finish Turning
When you have rough turned the work to within about 1/32 inch of the finished size, take a finishing cut. A fine feed, the proper lubricant, and, above all, a keen-edged tool are necessary to produce a smooth finish. Measure carefully to be sure you are machining the work to the proper dimension. Stop the lathe when you take measurements.
If you must finish the work to close tolerances, be sure the work is not hot when you take the finish cut. If you turn the workpiece to exact size when it is hot, it will be undersize when it has cooled.
Perhaps the most difficult operation for a beginner in machine work is to make accurate measurements. So much depends on the accuracy of the work that you should make every effort to become proficient in the use of measuring instruments. You will develop a certain “feel” in the application of micrometers through experience alone; do not be discouraged if your first efforts do not produce perfect results. Practice taking micrometer measurements on pieces of known dimensions. You will acquire skill if you are persistent.
Turning to a Shoulder
Machining to a shoulder is often done by locating the shoulder with a parting tool. Insert the parting tool about 1/32 inch from the shoulder line toward the small diameter end of the work Cut to a depth 1/32 inch larger than the small diameter of the work. Then machine the stock by taking heavy chips up to the shoulder. This procedure eliminates detailed measuring and speeds up production.
Figure illustrates this method of shouldering. A parting tool has been used at P and the turning tool is taking a chip. It will be unnecessary to waste any time in taking measurements. You can devote your time to rough machining until the necessary stock is removed. Then you can take a finishing cut to accurate measurement.
Boring
Boring is the machining of holes or any interior cylindrical surface. The piece to be bored must have a drilled or cored hole, and the hole must be large enough to insert the tool. The boring process merely enlarges the hole to the desired size or shape. The advantage of boring is that a true round hole is obtained, and two or more holes of the same or different diameters may be bored at one setting, thus ensuring absolute alignment of the axis of the holes.
Work to be bored may be held in a chuck, bolted to the faceplate, or bolted to the carriage. Long pieces must be supported at the free end in a center rest. When the boring tool is fed into the hole of work being rotated on a chuck or faceplate, the process is called single point boring. It is the same as turning except that the cutting chip is taken from the inside. The cutting edge of the boring tool resembles that of a turning tool. Boring tools may be the solid forged type or the inserted cutter bit type.
When the work to be bored is clamped to the top of the carriage, a boring bar is held between centers and driven by a dog. The work is fed to the tool by the automatic longitudinal feed of the carriage. Three types of boring bars are shown in figure. Note the center holes at the ends to fit the lathe centers.
Figure, view A, shows a boring bar fitted with a fly cutter held by a headless setscrew. The other setscrew, bearing on the end of the cutter, is for adjusting the cutter to the work
Figure, view B, shows a boring bar fitted with a two-edged cutter held by a taper key. This is more of a finishing or sizing cutter, as it cuts on both sides and is used for production work.
The boring bar shown in figure, view C, is fitted with a cast-iron head to adapt it for boring work
Figure –Boring bars.
Figure –Tapers.
of large diameter. The head is fitted with a fly cutter similar to the one shown in view A of figure . The setscrew with the tapered point adjusts the cutter to the work
TAPERS
Although you will probably have little need to machine tapers, we have provided the following explanation for your basic knowledge.
A taper is the gradual decrease in the diameter of a piece of work toward one end. The amount of taper in any given length of work is found by subtracting the size of the small end from the size of the large end. Taper is usually expressed as the amount of taper per foot of length or taper per inch of length. We will take two examples.
Example l.–Find the taper per foot of a piece of work 2 inches long. The diameter of the small end is 1 inch; the diameter of the large end is 2 inches.
The amount of taper is 2 inches minus 1 inch, which equals 1 inch. The length of the taper is given as 2 inches. Therefore, the taper is 1 inch in 2 inches of length. In 12 inches of length the taper is 6 inches. (See fig. 9-31.) Example 2.–Find the taper per foot of a piece 6 inches long. The diameter of the small end is 1 inch; the diameter of the large end is 2 inches. The amount of taper is the same as in example 1, that is, 1 inch. However, the length of this taper is 6 inches; hence the taper per foot is 1 inch times 12/6, which equals 2 inches per foot .
SAFETY PRECAUTIONS
In machining operations, always keep safety in mind, no matter how important the job is or how well you know the machine you are operating.
Listed here are some safety precautions that you MUST follow:
1. Before starting any lathe operations, always prepare yourself by rolling up your shirt sleeves and removing your watch, rings, and other jewelry that might become caught while you operate the machine.
2. Wear goggles or an approved face shield at all times whenever you operate a lathe or when you are near a lathe that is being operated.
3. Be sure the work area is clear of obstructions that you might fall or trip over.
4. Keep the deck area around your machine clear of oil or grease to prevent the possibility of slipping or falling into the machine.
5. Always use assistance when handling large workpieces or large chucks.
6. NEVER remove chips with your bare hands. Use a stick or brush, and always stop the machine.
7. Always secure power to the machine when you take measurements or make adjustments to the chuck.
8. Be attentive, not only to the operation of your machine, but also to events going on around it. NEVER permit skylarking in the area.
9. Should it become necessary to operate the lathe while the ship is underway, be especially safety conscious. (Machines should be operated ONLY in relatively calm seas.)
10. Be alert to the location of the cutting tool while you take measurements or make adjustments.
11. Always observe the specific safety precautions posted for the machine you are operating.
SUMMARY
In this chapter, you have learned the principal parts, the attachments and accessories, the uses and the basic operation of the engine lathe. Additionally, you have learned the basic operational safety precautions.
Source: http://www.fke.utm.my/lab2/automation/image/lathe%20operation.doc
Web site to visit: http://www.fke.utm.my
Author of the text: indicated on the source document of the above text
If you are the author of the text above and you not agree to share your knowledge for teaching, research, scholarship (for fair use as indicated in the United States copyrigh low) please send us an e-mail and we will remove your text quickly. Fair use is a limitation and exception to the exclusive right granted by copyright law to the author of a creative work. In United States copyright law, fair use is a doctrine that permits limited use of copyrighted material without acquiring permission from the rights holders. Examples of fair use include commentary, search engines, criticism, news reporting, research, teaching, library archiving and scholarship. It provides for the legal, unlicensed citation or incorporation of copyrighted material in another author's work under a four-factor balancing test. (source: http://en.wikipedia.org/wiki/Fair_use)
The information of medicine and health contained in the site are of a general nature and purpose which is purely informative and for this reason may not replace in any case, the council of a doctor or a qualified entity legally to the profession.
The texts are the property of their respective authors and we thank them for giving us the opportunity to share for free to students, teachers and users of the Web their texts will used only for illustrative educational and scientific purposes only.
All the information in our site are given for nonprofit educational purposes